What Are Nail Wraps + How Do They Work
To look down and see polished nails as I’m preparing food for my family or typing away on my computer, brings me endless satisfaction. Nail care has always been important to me, maybe it has something to with being an esthetician. A manicure is a self-care treatment that brings me joy and helps me feel like I’ve got my act together.
I haven’t used traditional nail polish in a long time and if I go to the salon, I bring my own natural gel nail polish. With my level of perfectionism (when it comes to my nails), I actually prefer to do my nails at home. One of the DIY options I’ve been crushing on is nail wraps. They are a convenient, mess-free, and cost-effective alternative to traditional salon manicures with no smell!
*Affiliate Disclosure: I do have affiliate links in this blog post. If you purchase something from my link, I will receive a small commission from the sale. This comes at no cost to you, but is paid by the company. I do not take becoming an affiliate with any company lightly. If I am, it’s because I believe in the company and their product.
*Suzi(Gurl Gone Green) is a participant in the Amazon Services LLC Associates Program, an affiliate advertising program designed to provide a means for sites to earn advertising fees by advertising and linking to amazon.com.
What Are Nail Wraps
Nail wraps offer many of the same benefits of a traditional manicure. Nail polish wraps are essentially stickers that wrap around the nail that mimic the appearance of real nail polish. They have natural nail wraps that don’t require any heat to adhere and also semi cured gel nail wraps that require heat for lasting results.
Nail wraps come in a variety of colors and intricate designs and have an easy application and removal process. If you’re someone who likes to change up your nail art with the seasons, holidays, or just your mood, nail wraps can cut down on your salon visits and save you money.
What Are Nail Wraps Made Of
Nail wraps are typically made of real nail polish ingredients, however, there are vinyl wraps that tend to be more flexible and offer bold patterns and even fabric wraps that are good for nail repair. Nail wraps may include a mix of polymers, safe solvents, and protective compounds.
Most nail wraps do not include formaldehyde, parabens and other harmful chemicals that can be found in traditional nail polishes. However, if it’s not a stated clean, non-toxic brand, then further investigation may be required to see what is in their ingredient list.
Related Content: Best Non Toxic Nail Polish
How Do Nail Wraps Work
1. Materials
Nail wraps usually consist of thin flexible sheets of vinyl, fabric, or gel nail polish strips and come in a variety of salon-worthy colors, patterns, and finishes.
2. Adhesive
Nail wraps come in the form of stickers and if they are gel wraps, they will require a heat lamp to adhere to the nail.
3. Longevity
On average, standard nail wraps that are not cured with a heat lamp last about a week, but gel nail wraps that are cured can last up to 3 weeks.
4. Removal
Soak nails in cuticle oil to loosen adhesive and use the cuticle stick to gently lift the wrap off of the nail.
Related Content: Best Non Toxic Gel Nail Polish
Are Nail Wraps Worth It?
Nail wraps are worth it in my opinion because they are easy to apply and remove, there’s no dry time and there are less liquids involved. Even when using clean, non-toxic nail polish, I paint my nails in the garage, because there’s always a bit of a chemical-like odor that lingers in the air. Not to mention, I would sometimes use acetone to remove my “non-toxic” nail polish off of my nails. With nail wraps, I can do my nails inside the house! This is actually a huge selling point for me because I can do them while talking to my hubs or hanging with my kids and not go out to the garage.
I also love that nail wraps are easy to remove without a lot of damage to my natural nails, if anything my nails are stronger! They also just look perfect! I’ve had so many people complement me on my nails and they didn’t realize I just had a nail wrap on! Plus, they last longer for me than traditional nail polish- so I feel like I’m doing my nails less, which I love as a mom of four.
How To Apply Nail Wraps
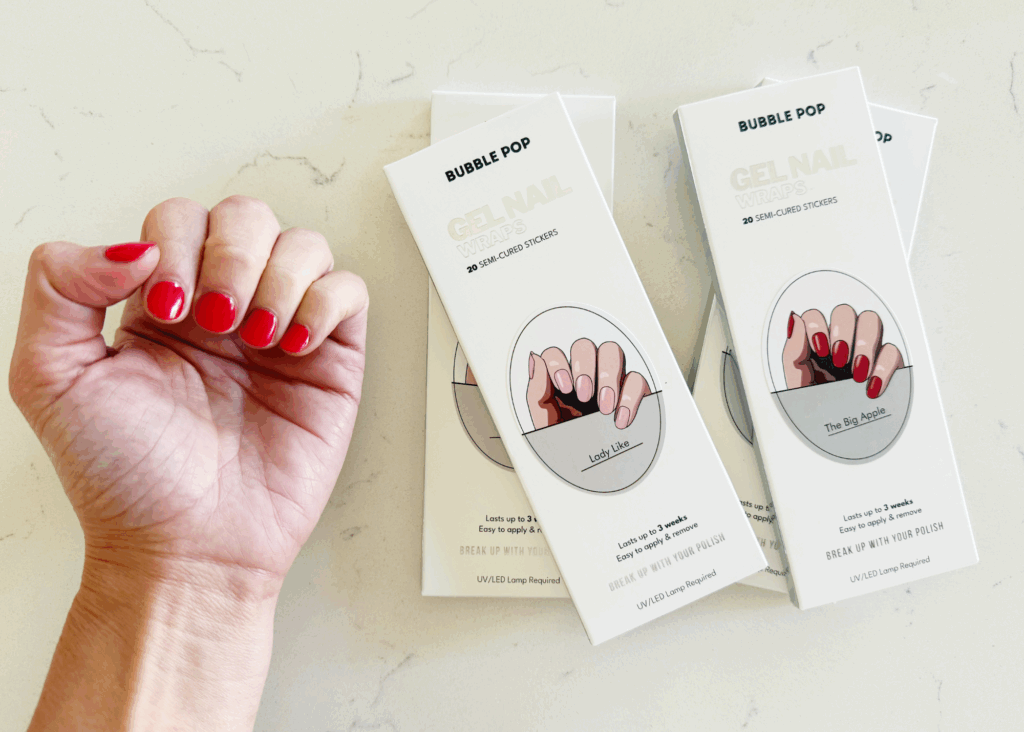
**I recommend the Bubblepop brand for nail wraps (use code GURLGONEGREEN15 to save 15%) . This is the brand I have been using**
Step 1: Buff nails. Wash hands or use an alcohol swab on nails to remove any oils, moisturizers, or other build-up. Make sure you really get all the oils off, I find when I buff, and swab with alcohol the nail wrap lasts longer.
(Optional) For gel nail wraps, apply a high quality base coat to fill in ridges and provide a smooth surface. I never do this step but they do suggest it.
Step 2: Find the right size of nail wrap for your nails. Apply nail wraps from the cuticle and press down while smoothing upwards with the cuticle stick. I don’t use the cuticle stick but just my hands to press down, but they do recommend the cuticle stick. I do recommend firmly pressing down all over on the nail, I feel like it really helps the longevity of the nail wrap.
Step 3: Cure under LED lamp for 60 seconds. So Bubblepop recommends trimming them before curing but a friend told me to cure them first and then trim and she was so right! It works so much better! They get hard when you cure them under the LED lamp and I feel like it helps them stay on better. Otherwise you’re trimming loose nail wrap which seems harder for me. Try it both ways and find what you like or what works best but I’ve found I prefer to cure first and then trim.
Step 4: Remove/trim the nail wrap from the top. I always clip first then file off excess nail wrap.
Step 5: Enjoy nails! For nail wraps that are not gel-based, apply a top coat for extra shine and to keep from snagging.
**Notes- I also recommend applying a gel topcoat like Dazzle Dry to the gel polish once they start to snag on hair- it helps them last even longer! Plus, it gives them a nice shine.
Another thing I wanted to mention is nail wrap removal. I usually can see them lifting and so they easily pop off without ruining my nail and like I said earlier, my nails feel stronger after having the nail wraps on. But if you do try to remove them early without soaking them in some cuticle remover or fingernail polish remover, you could damage your nail. I know, because this happened to me after my first round of nail wraps. So use the oil or nail polish remover if they’re not ready!
Kid’s Nail Wraps
I have tried Bubblepop’s Nail Wraps for kids and liked them (use code GURLGONEGREEN15 to save 15%)! They were easy to apply and I like that there’s no smell. The only issue we had was one of the fingers wasn’t fitting or there wasn’t a nail wrap that would fit that finger, so we had to cut one down. I think a kid’s smaller fingers are harder to probably match in general. They also aren’t gel, but just regular nail wraps, so we did apply a topcoat to them afterwards. One did fall off right away but it was the one we had to cut in order to fit her finger.
Gel vs Regular Nail Wraps
I did try Bubblepop’s regular nail wraps (not the gel wraps) and I didn’t like them as well as their gel nail wraps. The gels last longer and look more substantial and real than the regular nail wraps. Plus, the regular nail wraps you still have to apply a topcoat. I would definitely recommend the gel nail wraps (use code GURLGONEGREEN15 to save 15%) personally! However, if you don’t have an LED lamp, the regular nail wraps might a be a better option to start.
Final Thoughts
Overall, I can’t recommend Nail Wraps enough- specifically Bubblepop’s Gel Nail Wraps (use code GURLGONEGREEN15 to save 15%)! They are so good and I’m a true convert! I’ve never done my nails more consistently since having kids. I also feel like I’m saving money and time compared to traditional manicures because I’m not going anywhere and I’m doing them myself! They have so many fun options to test out to- keeps things fun!
Have you tried nail wraps? Share your thoughts below!
If you liked this post, check out these past posts: